You’ve finished installing your concrete pavers, but winter is approaching. Temperatures are dropping, overnight freezes are becoming more common, and there’s one important step left: filling the paver joints. Can you install polymeric sand in cold weather, or should you wait for better conditions?
Polymeric sand can help stabilize paver joints when it is properly selected, installed, compacted, activated, and allowed to cure. Cold weather makes that process more challenging because temperature, moisture, humidity, precipitation, and curing conditions can affect installation.
The key isn’t simply whether it’s “winter.” It’s whether conditions meet the requirements of the specific polymeric jointing sand you’re using.
Here’s what to consider when installing polymeric sand in cold weather, and how proper joint installation can help your concrete paver system perform well through repeated freeze-thaw cycles.
What Does Polymeric Sand Do Between Pavers?
Polymeric sand is a jointing material designed to fill the spaces between concrete pavers and other compatible paving units. Unlike ordinary loose joint sand, polymeric jointing sand contains binding agents (polymer binders) that are activated during installation according to the manufacturer’s directions.
Once properly installed and activated, the material:
- Helps stabilize joint material
- Helps resist joint-sand erosion
- Supports paver interlock
- Can discourage weed growth within properly filled joints
- Helps reduce routine joint-sand loss
No jointing product can guarantee a completely weed-free patio or driveway, or avoid erosion altogether. However, it does give homeowners a fighting chance to fix normal amounts of erosion, weed growth, and overall destabilization that can be addressed with basic maintenance.
What polymeric sand cannot do is compensate for poor pavement construction. It won’t correct an improperly prepared base, inadequate drainage, loose edge restraints, unstable pavers, or other installation deficiencies.
Polymeric Sand vs. Regular Joint Sand
Traditional joint sand and polymeric sand perform the same fundamental job, filling the joints between pavers, but they behave differently after installation.
Traditional joint sand remains loose, while polymeric jointing sand uses binding agents to help stabilize the material after proper activation and curing. There are also resin-based jointing compounds available for some applications, but they should not automatically be treated as interchangeable with polymeric sand.
Whichever jointing material is selected must be compatible with the paver, joint dimensions, installation, and intended application.
Bedding Sand vs. Polymeric Joint Sand: Don’t Confuse the Two
One of the most important distinctions in paver installation is the difference between bedding sand and joint sand.
What Bedding Sand Does
Bedding sand creates a consistent setting layer (also called the bedding layer) beneath the pavers in a typical concrete paver system.
Polymeric joint sand or other joint materials belong between compatible pavers after they have been placed.
The appropriate bedding sand specification depends on the pavement design, application, site conditions, and manufacturer’s requirements. Materials such as stone dust, concrete sand, or limestone screenings should not be assumed to be suitable substitutes simply because they’re readily available.
Similarly, polymeric sand shouldn’t be used as a bedding material unless a specific pavement system expressly calls for it.
For both layers, use materials that meet the specifications for the particular concrete paver installation rather than treating all “paver sand” as the same product.
Can You Install Polymeric Sand in Cold Weather?
Potentially, but only if the weather and pavement conditions remain within the polymeric sand manufacturer’s requirements throughout installation, activation, and the required curing period.
Cold-weather installation becomes difficult because several conditions can change at once. Air temperatures may be acceptable during the afternoon but fall sharply overnight.
The paver surface can remain colder than the surrounding air, while snow, frost, or residual moisture can leave the joints unsuitable for installation.
Humidity, approaching rain or snow, and insufficient drying time can create additional problems.
That’s why there isn’t one universal minimum temperature that applies to every polymeric sand cold-weather install.
Follow the Manufacturer’s Minimum Installation Temperature
Before opening the bag, read the current installation instructions for the exact polymeric sand being used.
Verify the manufacturer’s requirements for:
- Minimum installation and surface temperatures
- Moisture and joint conditions
- Water-activation procedures
- Expected precipitation
- Required curing or drying period
- Overnight temperatures and freezing conditions
Don’t select a temperature threshold from another polymeric sand product and assume it applies to yours.
If the required conditions can’t be maintained long enough to complete installation and curing correctly, waiting for a suitable weather window is generally preferable to forcing the installation because winter is approaching.
How to Install Polymeric Sand So It Performs Through Winter
Correct installation matters in every climate. In regions with repeated freeze-thaw cycles, proper pavement construction, drainage, joint filling, and activation become particularly important.
1. Start With a Properly Installed Paver System
Before adding polymeric sand, make sure the pavement itself is ready for joint installation.
- The base and bedding layer should be constructed for the intended application
- Concrete pavers should be properly installed and stable
- Edge restraints should be secure
- The pavement should drain as designed
Polymeric sand is one component of an interlocking pavement system. It cannot correct settlement, movement, poor drainage, or inadequate base construction.
2. Make Sure the Surface and Joints Meet Product Requirements
Check the paver surface and joints before spreading the material.
The joints should meet the polymeric sand manufacturer’s requirements for joint depth, width, cleanliness, and moisture. Don’t assume that joints containing frost, snow, ice, or excess moisture are ready simply because the air temperature has risen temporarily.
This is particularly important during late fall and winter, when conditions at the pavement surface may differ considerably from the daytime forecast.
3. Sweep the Polymeric Sand Into the Joints
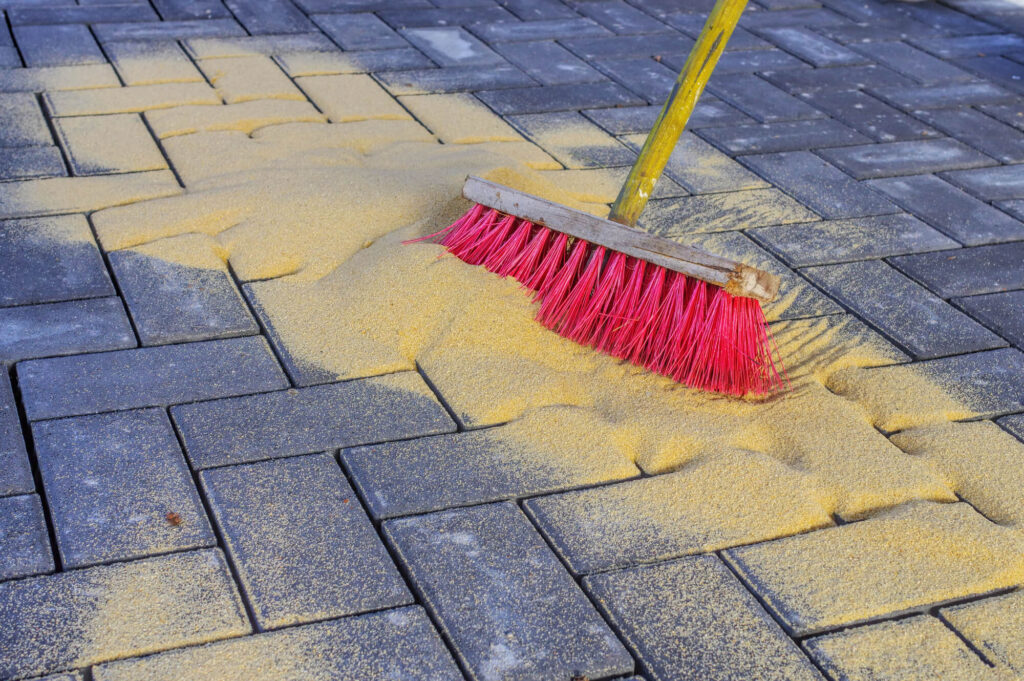
Spread the polymeric sand over the paver surface and use a broom to sweep it thoroughly into the joints according to the product instructions.
Work systematically so joints are filled consistently, rather than concentrating material in only the upper portion of the joint.
4. Compact and Refill the Joints as Required
Compaction helps joint material settle into the spaces between pavers instead of remaining loosely filled near the surface.
Where required for the paver and jointing system, an appropriate vibratory plate compactor with the specified protective equipment can be used. Additional polymeric sand is then swept into joints as necessary.
The exact sequence and equipment requirements vary, so follow the instructions for both the pavers and jointing product.
5. Remove Excess Sand From the Paver Surface
Before water activation, carefully remove polymeric material remaining on the face of the pavers.
A broom and, where permitted by the product’s installation guidelines, a leaf blower can help remove residual particles without emptying the joints.
This step matters. Polymeric material left on the paver surface can become difficult to remove after activation and may contribute to unwanted haze or residue.
6. Activate the Polymeric Sand Exactly as Directed
Polymeric sand relies on a manufacturer-specified activation process. Applying water incorrectly can compromise an otherwise careful installation.
Too little water may prevent proper activation.
Excessive or improperly applied water can wash material out of the joints or move polymeric residue across the paver surface.
Follow the manufacturer’s instructions for water application, activation, and curing rather than improvising based on another product you’ve used.
Once activated, protect the installation from conditions the manufacturer identifies as unsuitable while the joint material cures.
Why Drainage and Compaction Matter During Freeze-Thaw Cycles
Polymeric sand alone doesn’t make a paver project installation immune to winter, whether the entire surface is made up of brick pavers, natural stone pavers, or standard concrete pavers.
Water still has to be managed throughout the pavement system.
Proper base construction and compaction, suitable bedding material, stable edge restraints, surface slope, drainage, and correctly installed joint material all contribute to long-term performance. Interlocking Concrete Pavement Institute guidance reflects this same principle across hardscape projects of every kind, whether it’s a paver patio, residential driveways, or a larger outdoor space designed for heavy foot traffic. Base must extend below the frost line for stability, and open-graded bases reduce frost heave by improving drainage, which matters even more in northern climates and other freeze thaw climates where frost heave is a recurring concern.
During winter, melting snow and ice introduce additional moisture. If water repeatedly accumulates in or around the pavement and then freezes, the resulting freeze-thaw cycles can expose weaknesses elsewhere in the system, particularly where proper drainage or proper slope wasn’t part of the original patio installation.
Joint Sand Freeze-Thaw Problems to Watch For
After winter, inspect the pavement for low or missing joint material, loose pavers, movement, settlement, heaving, recurring standing water, or changes around the pavement edges. Individual pavers that shift independently of the rest of the entire surface are often an early sign of joint erosion or surface wear beneath.
Joint-sand loss doesn’t automatically mean the polymeric sand itself failed. The underlying cause may involve installation, drainage, maintenance practices, pavement movement, or other conditions. Trapped moisture can freeze, expand, and ruin the bond of polymeric sand joints, which is one of the more common freeze thaw damage patterns property owners run into.
Correct the cause before repeatedly topping off the joints.
Common Polymeric Sand Installation Mistakes
Many polymeric sand problems can be traced back to installation conditions or application practices rather than winter weather alone.
Common mistakes include:
- Installing outside the jointing product’s temperature or weather requirements, including on frozen ground or ahead of heavy rain
- Applying material to pavers or joints that don’t meet moisture requirements
- Failing to fill and compact joints adequately, which undermines proper compaction across the base material
- Leaving polymeric residue on the paver surface before activation
- Using too much or too little water during activation, rather than the fine mist recommended to avoid washing the material out
- Installing material in incompatible joint widths or depths, since wider joints or unusually narrow joint sand options both call for different handling
- Ignoring drainage or pavement-movement problems, including lateral movement in the base beneath the pavers
- Using aggressive pressure washers, or metal shovels during snow removal, that remove or damage joint material
- Allowing the installation to encounter rain, freezing temperatures, or other prohibited conditions before the required cure period is complete
Following one complete set of the manufacturer’s instructions, from preparation through curing, is safer than combining techniques from several different polymeric sand products or installation techniques picked up from home improvement stores.
Should You Seal Pavers After Installing Polymeric Sand?
Sealing is a separate maintenance decision and shouldn’t be treated as a required final step for every polymeric sand installation.
If a paver sealer is being considered, first confirm compatibility among the concrete pavers, polymeric jointing material, existing surface treatments, and selected sealer. The jointing material should also complete any required curing period before subsequent treatments are applied.
Visible efflorescence or other surface residue should be addressed before sealing, as applying sealer over any unresolved surface condition can make the problem more difficult to correct later.
Always follow the preparation, moisture, application, and curing requirements provided by the relevant manufacturers.
What If Winter Arrives Before You Can Install the Joint Sand?
Sometimes the best cold-weather installation decision is not to install polymeric sand yet.
If the pavers are too cold, joints contain moisture or frost, precipitation is approaching, or temperatures won’t remain within the product’s requirements during curing, don’t try to compensate by changing the activation procedure or rushing the installation process.
The appropriate next step depends on the pavement system, application, joint condition, expected traffic, and jointing product. Driveways and other vehicular applications deserve particular attention because the pavement will be subjected to additional loading, and residential driveways carrying heavy trucks or regular vehicle traffic need a base layer built to match that load, not just a standard patio spec.
Consult the polymeric sand manufacturer, your paver manufacturer’s technical guidance, or a qualified hardscape professional about how to protect an unfinished installation until suitable conditions return.
Prepare Your Paver Joints for the Next Freeze-Thaw Season
Successful joint sand freeze-thaw performance begins well before the first hard freeze, ideally with an early fall inspection while conditions still allow for repairs.
Polymeric sand is an important part of many concrete paver installations, but it’s still only one part of the system.
A suitable base, properly specified bedding layer, stable concrete pavers, secure edge restraints, correctly installed joint material, effective drainage, required curing time, and ongoing maintenance all work together to support long-term performance in cold climates. Proper base preparation, including deeper excavation and specialized equipment where uneven surfaces or poor grading are involved, protects structural integrity through both extreme heat in summer and frozen ground in winter. French drains help direct water away from paver surfaces where standing water or surface water tends to collect, and open-graded bases improve drainage and reduce frost heaving in exactly the freeze thaw conditions that cause the most damage over time.
Interlocking concrete pavers flex with ground movement in cold climates, which gives them an advantage over poured concrete or concrete slabs prone to cracking under the same thermal expansion. Permeable pavers offer superior drainage for properties dealing with heavy rain or a particularly wet season, reducing the water infiltration issues that contribute to washout. Polymeric sand reduces washout during heavy spring rains, but proper grading, adequate square foot coverage of base material, and routine maintenance, including work to remove debris from joints, all matter just as much for optimal performance. Rock salt use should also be limited where possible, since it can accelerate joint erosion and surface wear over multiple freeze-thaw seasons.
Rochester Concrete Products provides installation information, technical resources, product guidance, and local support to help homeowners, contractors, and dealers make informed decisions about concrete paver installation and maintenance.
Explore RCP’s installation and technical resources, contact your local RCP representative, or speak with a knowledgeable RCP dealer or qualified hardscape professional for guidance specific to your project.